Getting Started
Last updated: 2026-05-10
Your Trainer is a multi-rider indoor cycling app for Android tablets. Smart-trainer control with local data + local control. One-time purchase.
From install to first completed ride in about thirty minutes. This page walks through the seven steps in order; each step is a couple of taps once you know where to look.
1. Hardware checklist
You'll need three things plugged in before the first ride:
- An Android device running Android 10 or newer. Any tablet works well; a 10-inch or larger screen gives the most readable dashboard. The app also runs on phones — convenient when a tablet isn't to hand.
- A smart trainer that supports FTMS. Most modern direct-drive trainers do; the hardware guide covers what to look for.
- A heart-rate monitor (optional, but useful). Any Bluetooth chest strap or arm band works. Optional for Power and Route rides; required for HR-Zone workouts.
2. Install & permissions
Install Your Trainer from Google Play. On first launch the app asks for one or two permissions:
- Nearby devices on Android 12+, or Location on Android 10–11. Required for Bluetooth scanning. Your Trainer never reads or stores your location; the older Android versions just gate Bluetooth behind that permission. Granting it is the way through.
- Notifications on Android 13+. Used for ride-state notifications and Strava-upload status. Optional.
3. Connect your smart trainer
Wake the trainer (most direct-drives wake on a quarter-pedal-rotation) and confirm Bluetooth is on. In the app, open the workout-selection screen and tap the Equipment Hub. Your trainer should appear within a few seconds; tap it. The slot shows Connecting… for a moment, then settles on Connected with a status badge in the bottom-right of the slot, in the app accent colour.
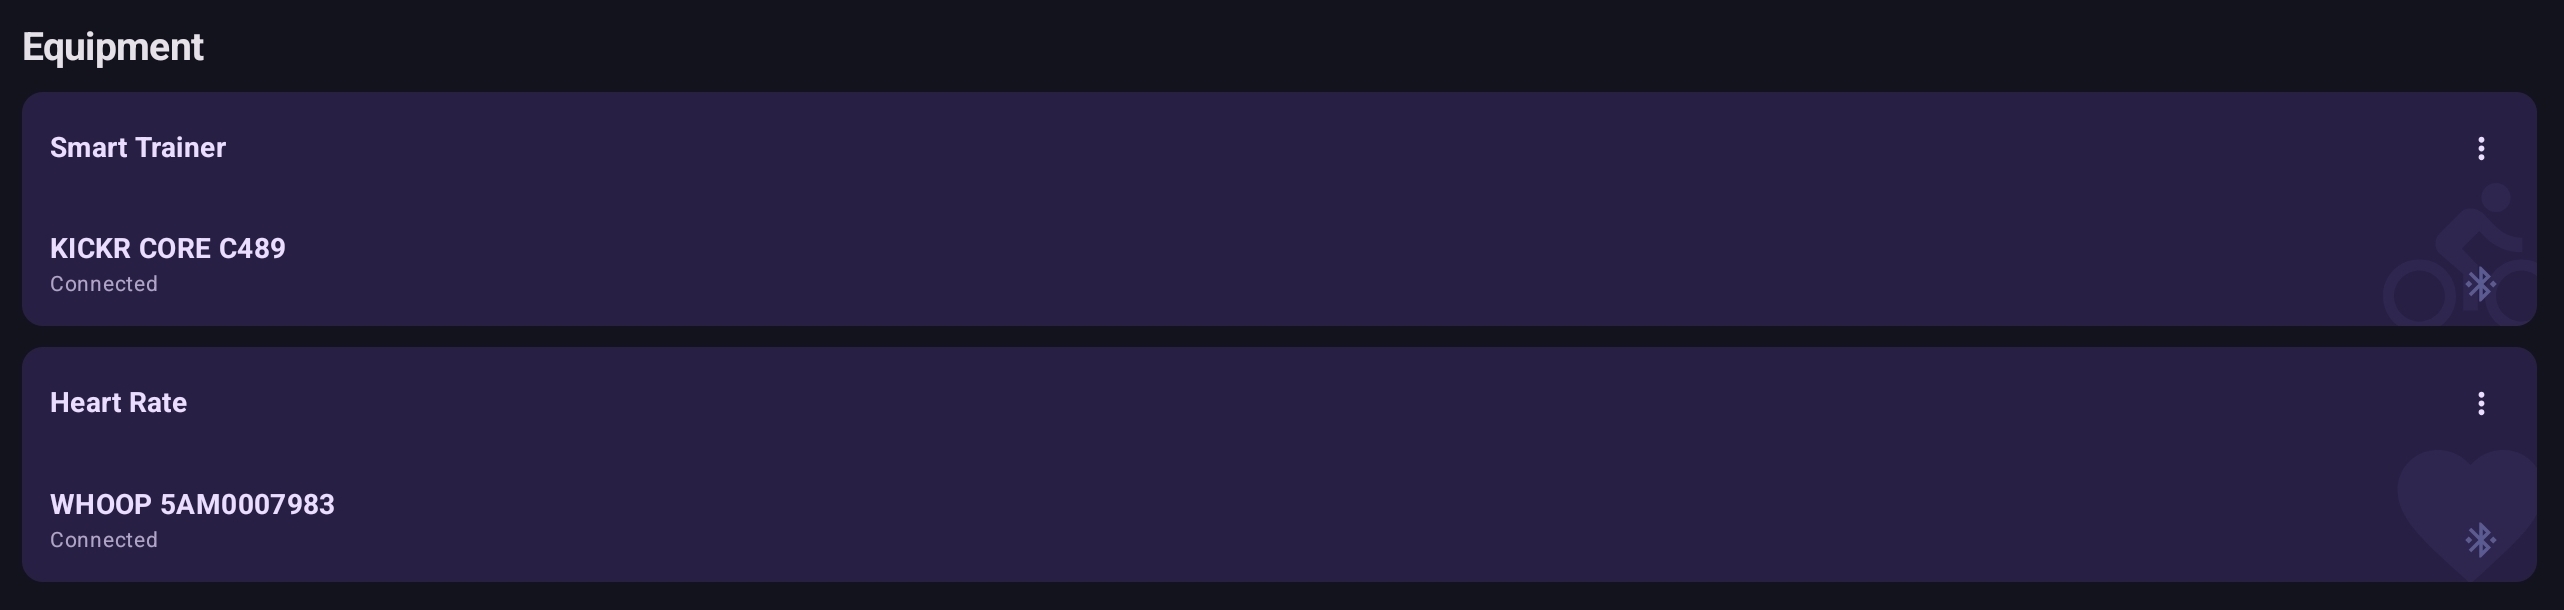
The trainer is saved as your Preferred Smart Trainer (visible later under Settings → Hardware). Next launch, it auto-connects without scanning. If the trainer was asleep or off when you opened the app, the slot reads Tap to reconnect instead — wake the trainer and tap the slot to retry.
Each Equipment Hub slot has a ⋮ menu in its title row, with Forget device (clears the saved preferred device so you can connect a different one), Change device (opens the scanner to pick another), and Device info (name, address, connection state). The same menu also opens on long-press if you prefer.
4. Connect your HRM (optional)
Same flow: from the workout-selection screen, tap the Equipment Hub and pick a heart-rate monitor. Damp the chest-strap contact pads slightly first — sweat conducts; dry contacts often fail to connect.
Optional for Power and Route rides — they work fine without one — but useful even there: heart-rate cost on Personal Bests, HR Efficiency on the rider card, and the Z2 / Z4 character of an interval all benefit from HR data. HR-Zone workouts are the one case that requires an HRM.
The chosen monitor is saved against your rider profile as the Preferred Heart Rate Monitor (visible later under Profile → Connected) so it auto-connects on launch. You can come back to this step whenever — trainer settings stay put.
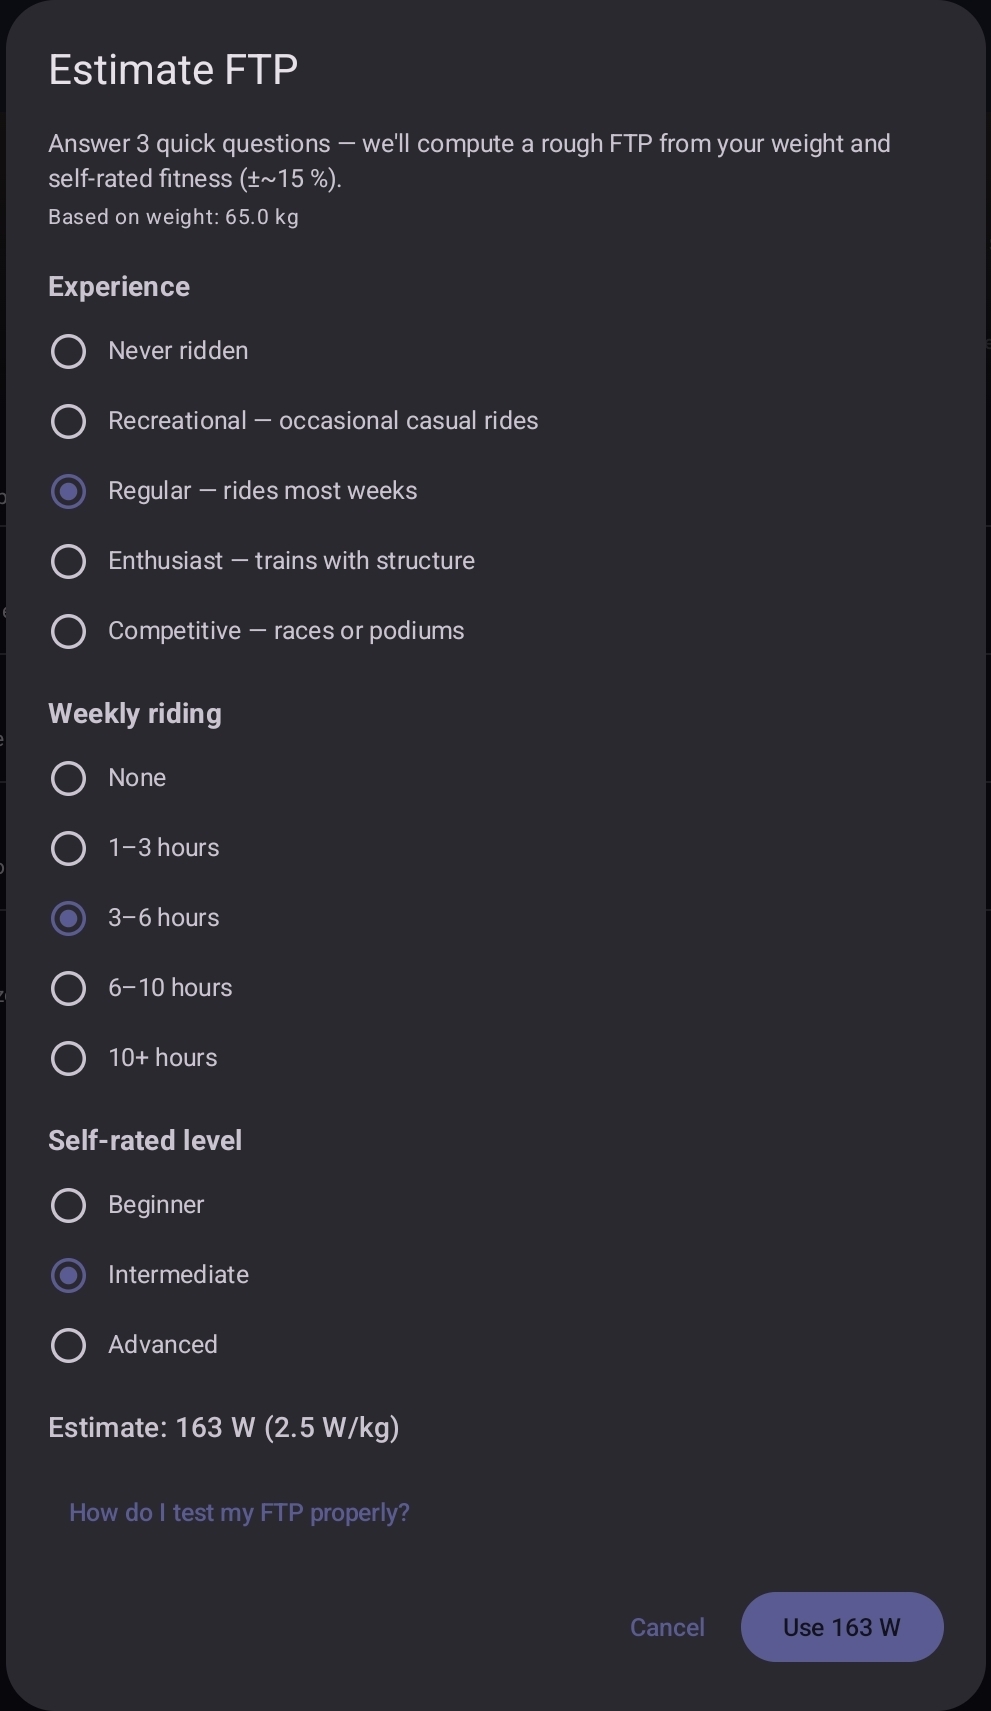
5. Set your FTP
Your FTP anchors every power workout — Z2 endurance, sweet spot, threshold intervals all derive from it. Set it in Profile → FTP.
If you don't have a measured FTP, the FTP row has an Estimate… button that opens a three-question dialog (experience, weekly hours, self-rated level). It returns a starting figure scaled by your recorded weight, accurate to roughly ±15 %. Tap Use … W to drop the value into the FTP field. (Set your weight first — the estimator needs it.)
If you'd rather pick a number yourself, an educated guess gets you started:
- 2.0 W/kg — recreational rider, new to structured training.
- 2.5–3.0 W/kg — riding several hours a week.
- 3.5+ W/kg — regular endurance cyclist.
Multiply by your weight in kg. Refine after a few rides — the workout intensity will tell you whether the guess was high or low. The training zones page has the full reasoning.
FTP test (optional)
For a measured FTP without the mental cost of a 20-minute time trial, use the in-app ramp test. From the workout-selection screen pick FTP Test (Ramp) under the Power tab. The test starts easy and steps up 10 W per minute until you can't hold the wattage; the app sets your FTP from the highest minute you completed.
Allow about 25–30 minutes. Schedule it for a fresh day; ramp tests after a hard week under-read.
6. Pick a workout
The workout-selection screen has three tabs:
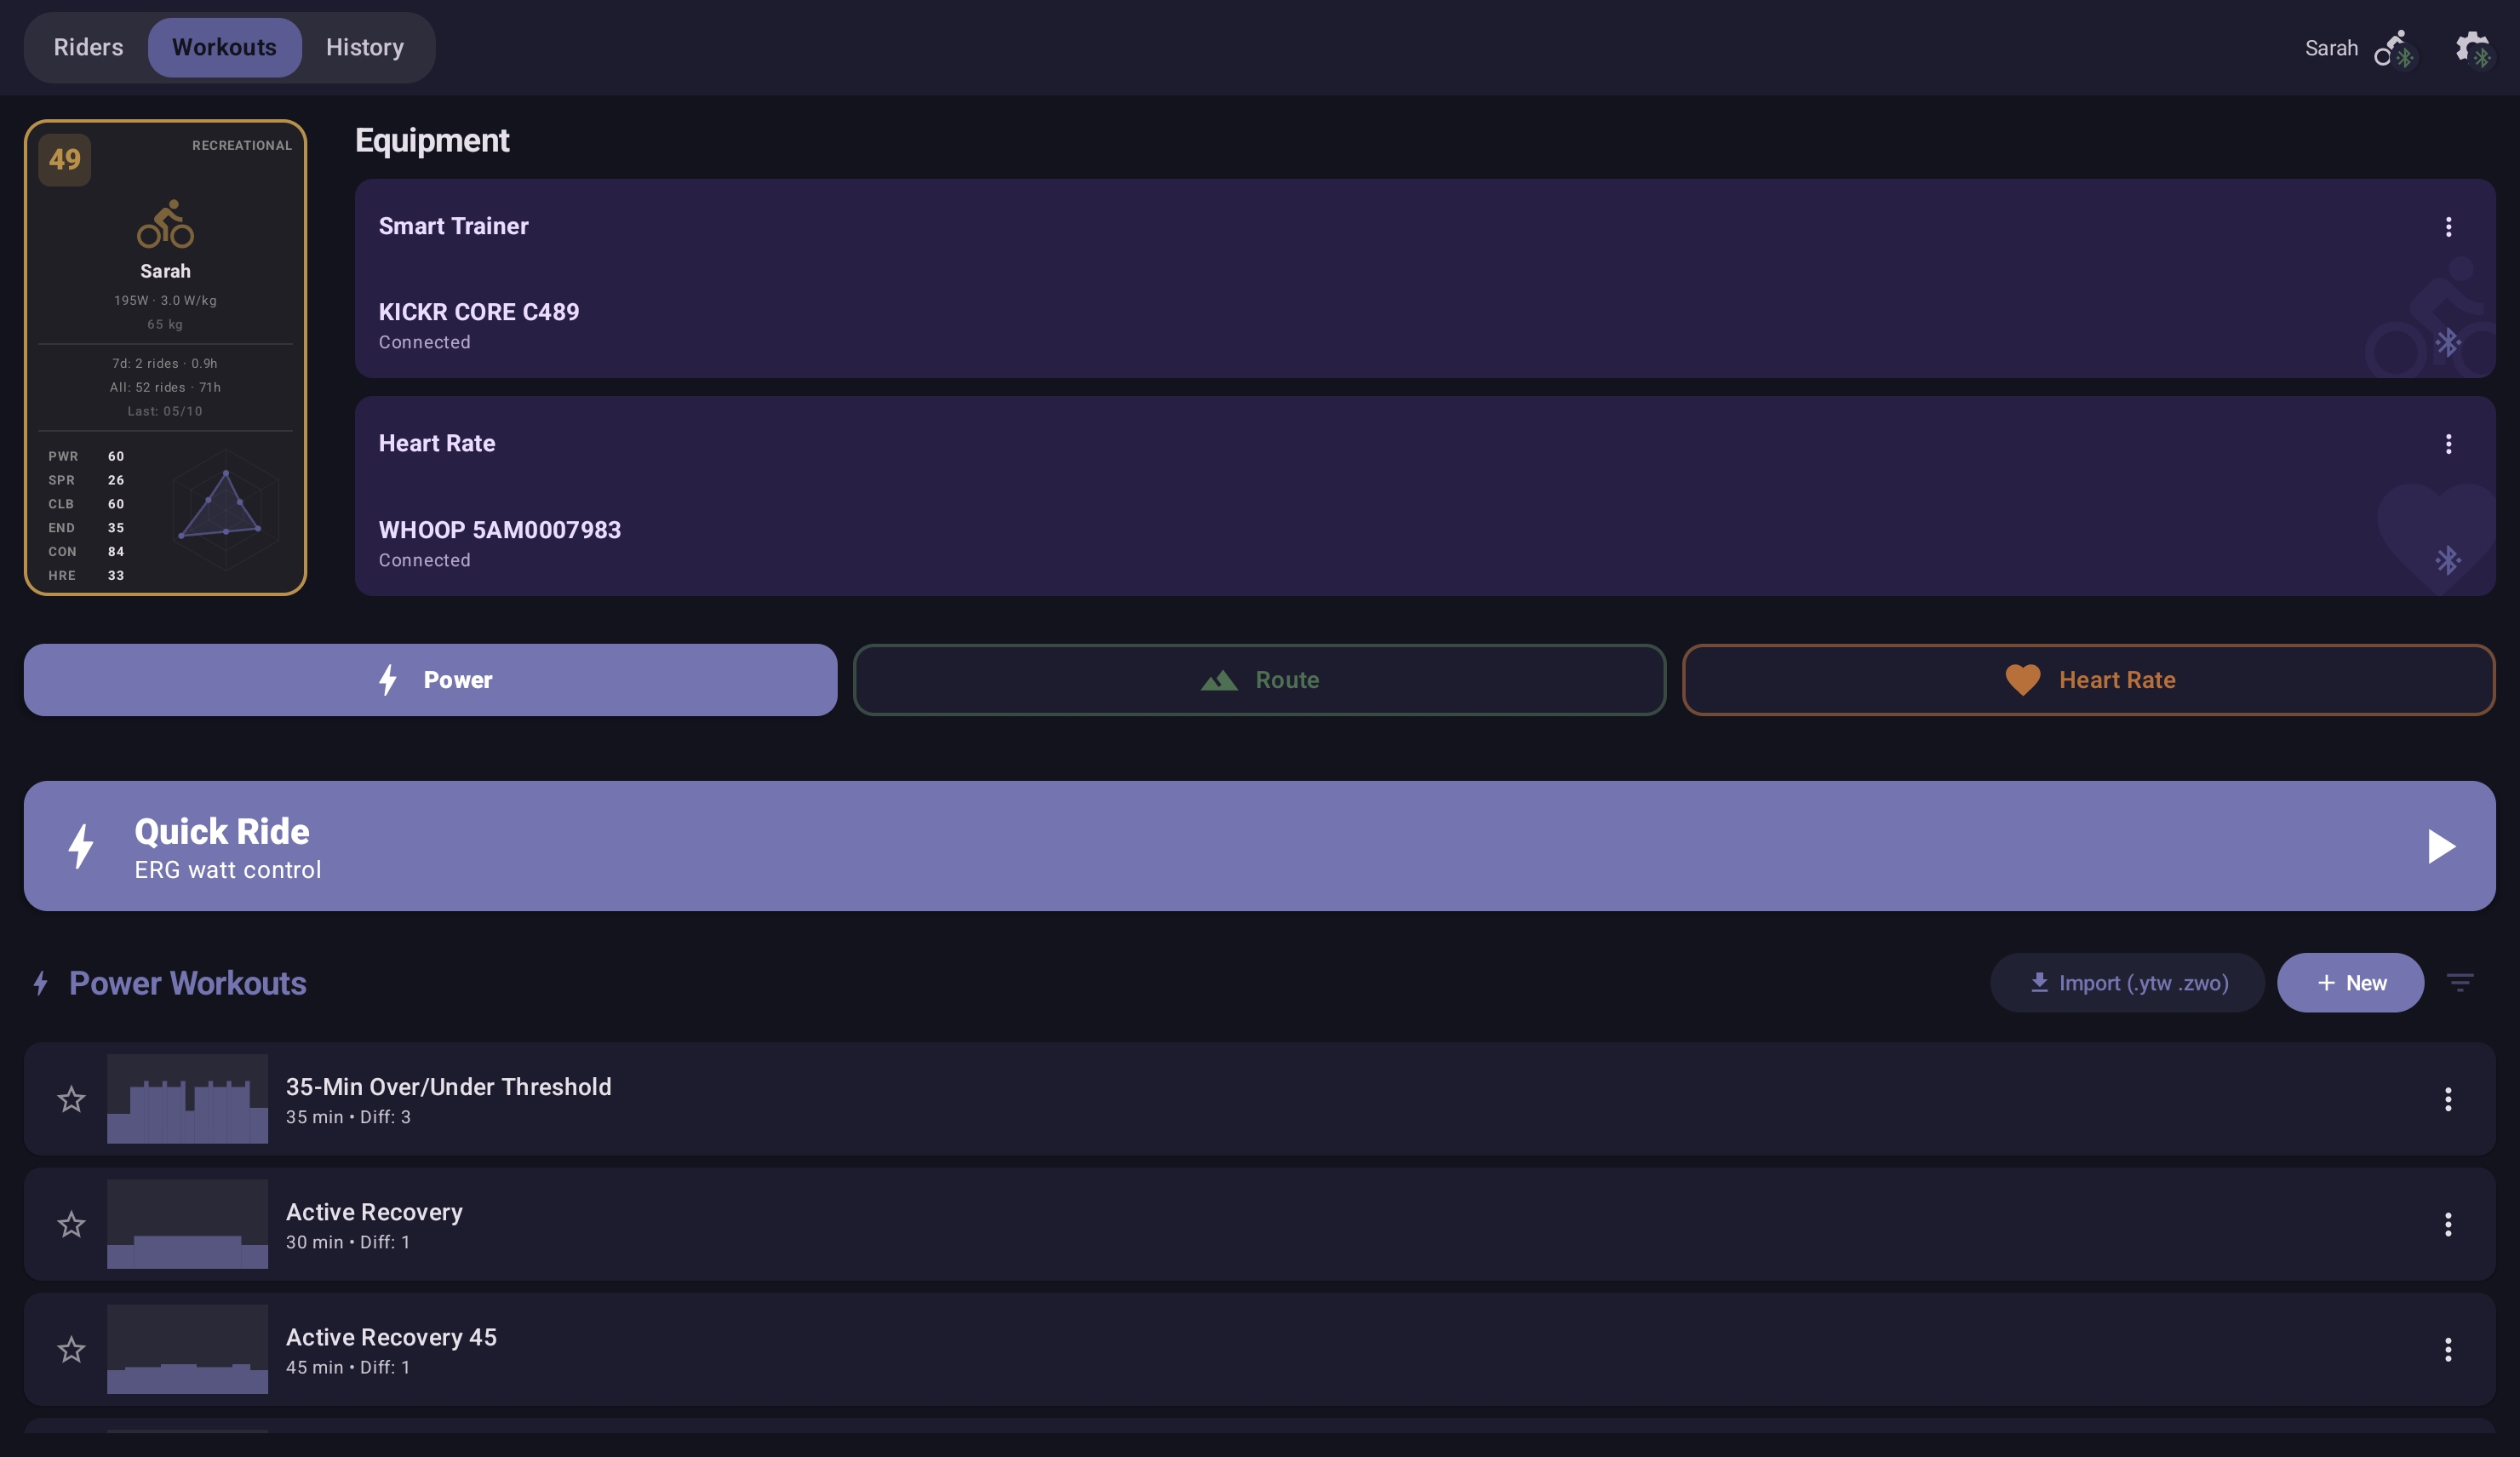
- Power — FTP-anchored intervals. The tab's Quick Ride card at the top holds a fixed wattage if you'd rather skip the script.
- Route — slope-driven simulation rides from GPX / FIT / TCX files. The tab's Free Ride card gives you simulation mode without a route loaded. See the routes guide.
- Heart Rate — workouts that target heart-rate zones rather than wattage. The trainer adjusts power live to keep your HR in the prescribed zones — useful when you want to train by feel and let the cardiovascular load drive the effort. The tab's Zone Ride card holds a single target HR zone via the HR Zone-Lock thermostat — see Quick / Free / Zone Ride.
For a first ride, pick something gentle — a Z2 endurance session, a short sweet-spot workout, or one of the unstructured-ride cards at an easy effort. Each tab ships with a sizeable bundled library (dozens of pre-defined Power, Heart Rate, and Route workouts). Beyond the bundled set you have several options:
- Import Zwift workouts (
.zwo) or community.ytwfiles via the share sheet from email, Drive, or any file manager. - Generate one with the AI Workout Coach — a one-line description is enough.
- Build your own in the visual workout editor — drag interval blocks for power and duration; preset templates seed common shapes.
7. Complete your first ride
Tap the workout, then START. The dashboard appears with the live terrain visualization, your power / HR / cadence panel, and the upcoming-intervals strip at the bottom.
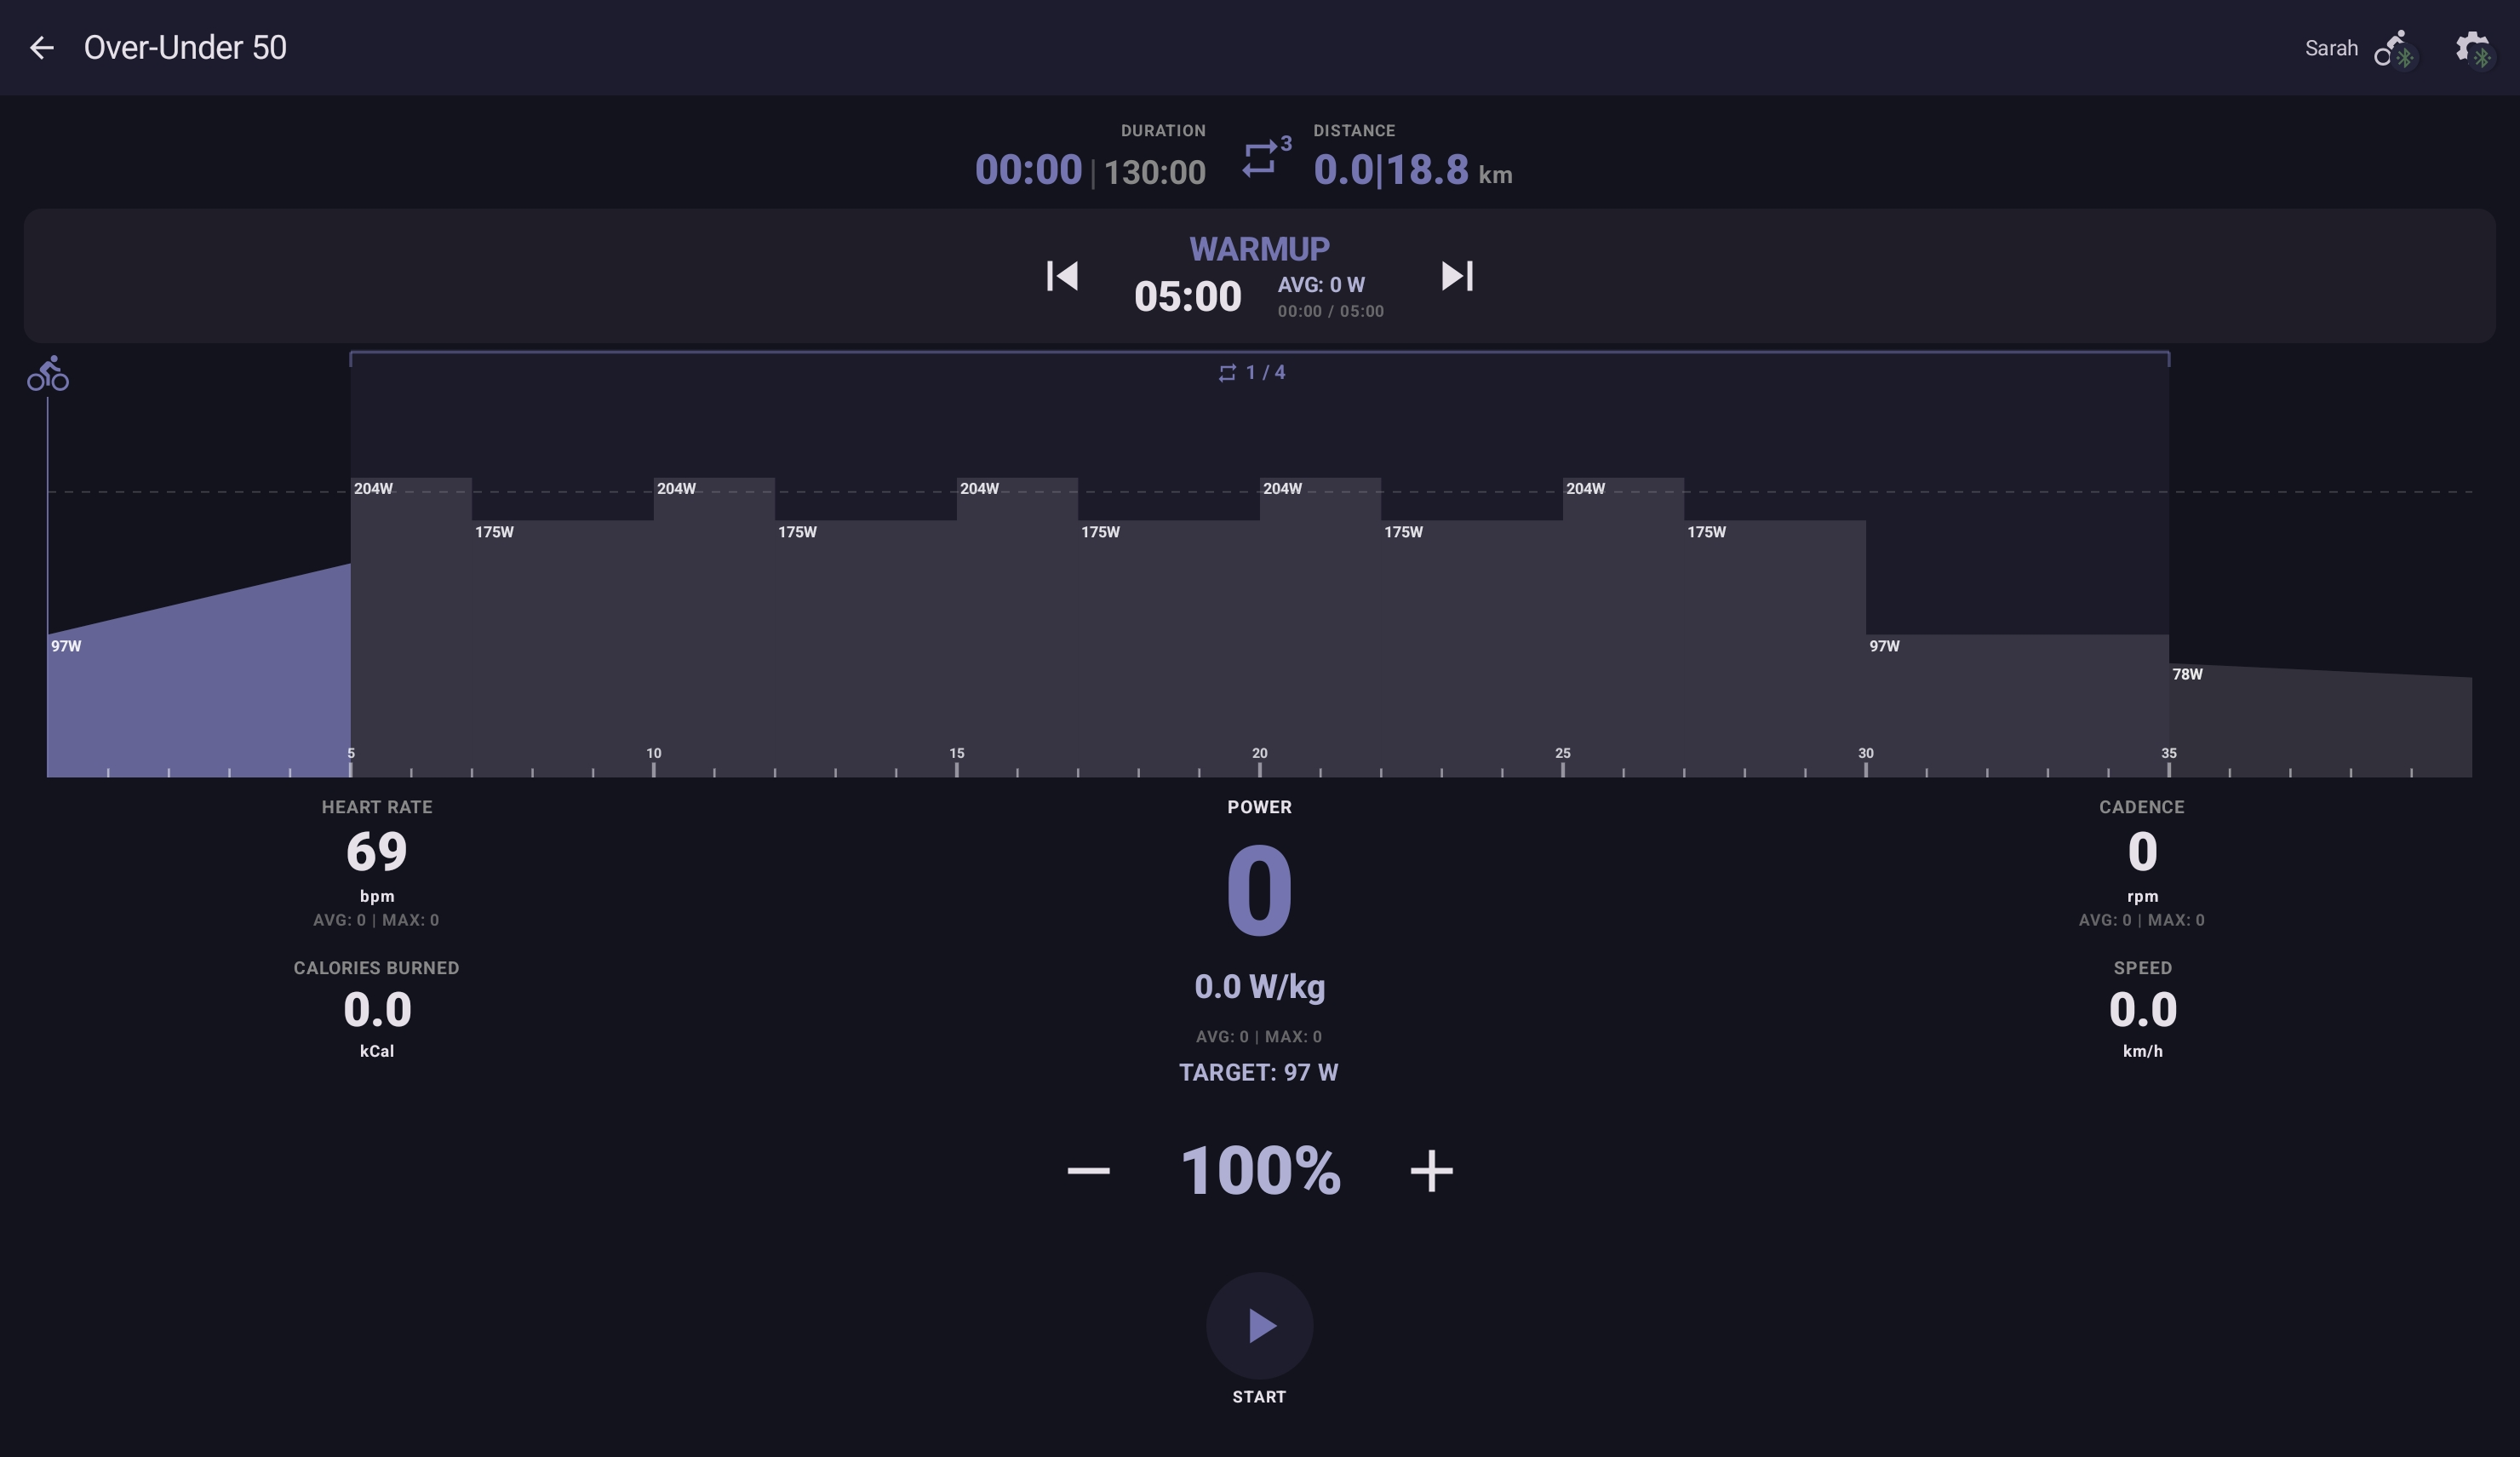
The notes below assume you've picked a structured Power workout (the most common first choice). Heart Rate and Route workouts share the dashboard but have their own controls — covered in the dedicated guides linked from Manual & Guides.
- Cadence matters. The trainer holds you to a target wattage in ERG mode; you choose the cadence. Aim for 80–95 RPM for most blocks; drop to 60–70 for low-cadence blocks if the workout asks for it.
- You can pause. Tap the screen → PAUSE. Useful for a quick water break; the workout resumes from where you left off.
- You can finish early. Tap FINISH on the cockpit. The session is saved with whatever blocks you completed.
- You can loop the workout body. Tap the cockpit's Repeat button to cycle through extra runs of the main intervals — 1×, 2×, 3×, or ∞. Warm-up runs once at the start, cool-down once at the end after the last loop. The badge shows the count remaining. Full coverage at Workout Library → loop the whole workout.
- Split-screen works. Pull a video app alongside the dashboard — race footage, music, a virtual course — without losing the metrics.
When the workout ends, a summary card shows the session metrics and — for structured workouts you've ridden before — how this one compares to your personal best. First-time rides become the PB by definition; subsequent rides show "+X bpm vs PB" or "−Y BPM, new PB!" alongside the numbers. The session lands in your Workout History with the full metric breakdown. If you've connected Strava (Profile → Strava), the upload starts in the background.
What's next
- Browse the workout library — categories, what each is for, how to import.
- Quick / Free / Zone Ride — the three unstructured-ride modes and the HR-zone thermostat.
- Personal Bests & Ghost Rider — how the app tracks improvement and replays your previous best on routes.
- Riders & Family — adding household riders, the rider card, the rating panel that unlocks after five sessions, the family leaderboard and family ghosts.
- AI prompt skills — generate workouts from plain-text descriptions.
- Training zones — what each zone delivers, when to retest your FTP.
- Hardware guide — supported trainers, HRMs, device recommendations.
For long-term peace of mind, two complementary options:
- Settings → Data → Export Device Backup writes a
.ytbackup.json.gzfile with every rider's profile, sessions, personal bests, favourites, and custom workouts. The most complete copy. - Profile → Export My Data writes a
.ytrider.json.gzfile with one rider's data. Useful for sharing your history or moving a single rider between devices.
Either file restores via Settings → Data → Import Backup. A per-rider file (.ytrider.json.gz) also restores via User Selection → Add Rider → Import from file, or via Profile → Data → Import & Merge on an existing rider to fold the file's sessions and PBs into that rider. Worth running an export periodically.