Routes Guide
Last updated: 2026-05-07
Your Trainer is a multi-rider indoor cycling app for Android tablets. Smart-trainer control with local data + local control. One-time purchase.
Slope-driven simulation rides — pick a real-world route, load the GPX, FIT, or TCX file, and the trainer follows the elevation profile while you choose the gearing and cadence. This page covers where to find good route files, the elevation requirement, how to import, and what to do when a route file misbehaves.
How route rides differ from interval workouts
An interval workout (Power or HR-Zone) tells the trainer what wattage or HR zone to hold; the rider's job is to maintain cadence. A route ride flips that: the trainer simulates the slope at every point along the route, and the rider's gear / cadence / effort determine the speed. Hard climb? You'll work harder regardless of gearing. Long descent? You'll spin out unless you back off.
This makes route rides feel closer to outdoor riding — the resistance changes with the terrain rather than chasing a target wattage. They're slower (in real-time), longer, and a different fatigue profile than structured intervals.
Route map view
Route mode renders the route as a top-down polyline on a clean Compose Canvas — no basemap, no satellite, no street labels. The map auto-orients to fit the route in the viewport: a long thin route lays out horizontally, a roundish loop stays roughly square. The polyline is coloured by gradient: blue on descents, green on flat, yellow / orange / red on climbs of increasing steepness. A small rider icon shows your position; checkpoints and notable landmarks render as discrete markers along the line.
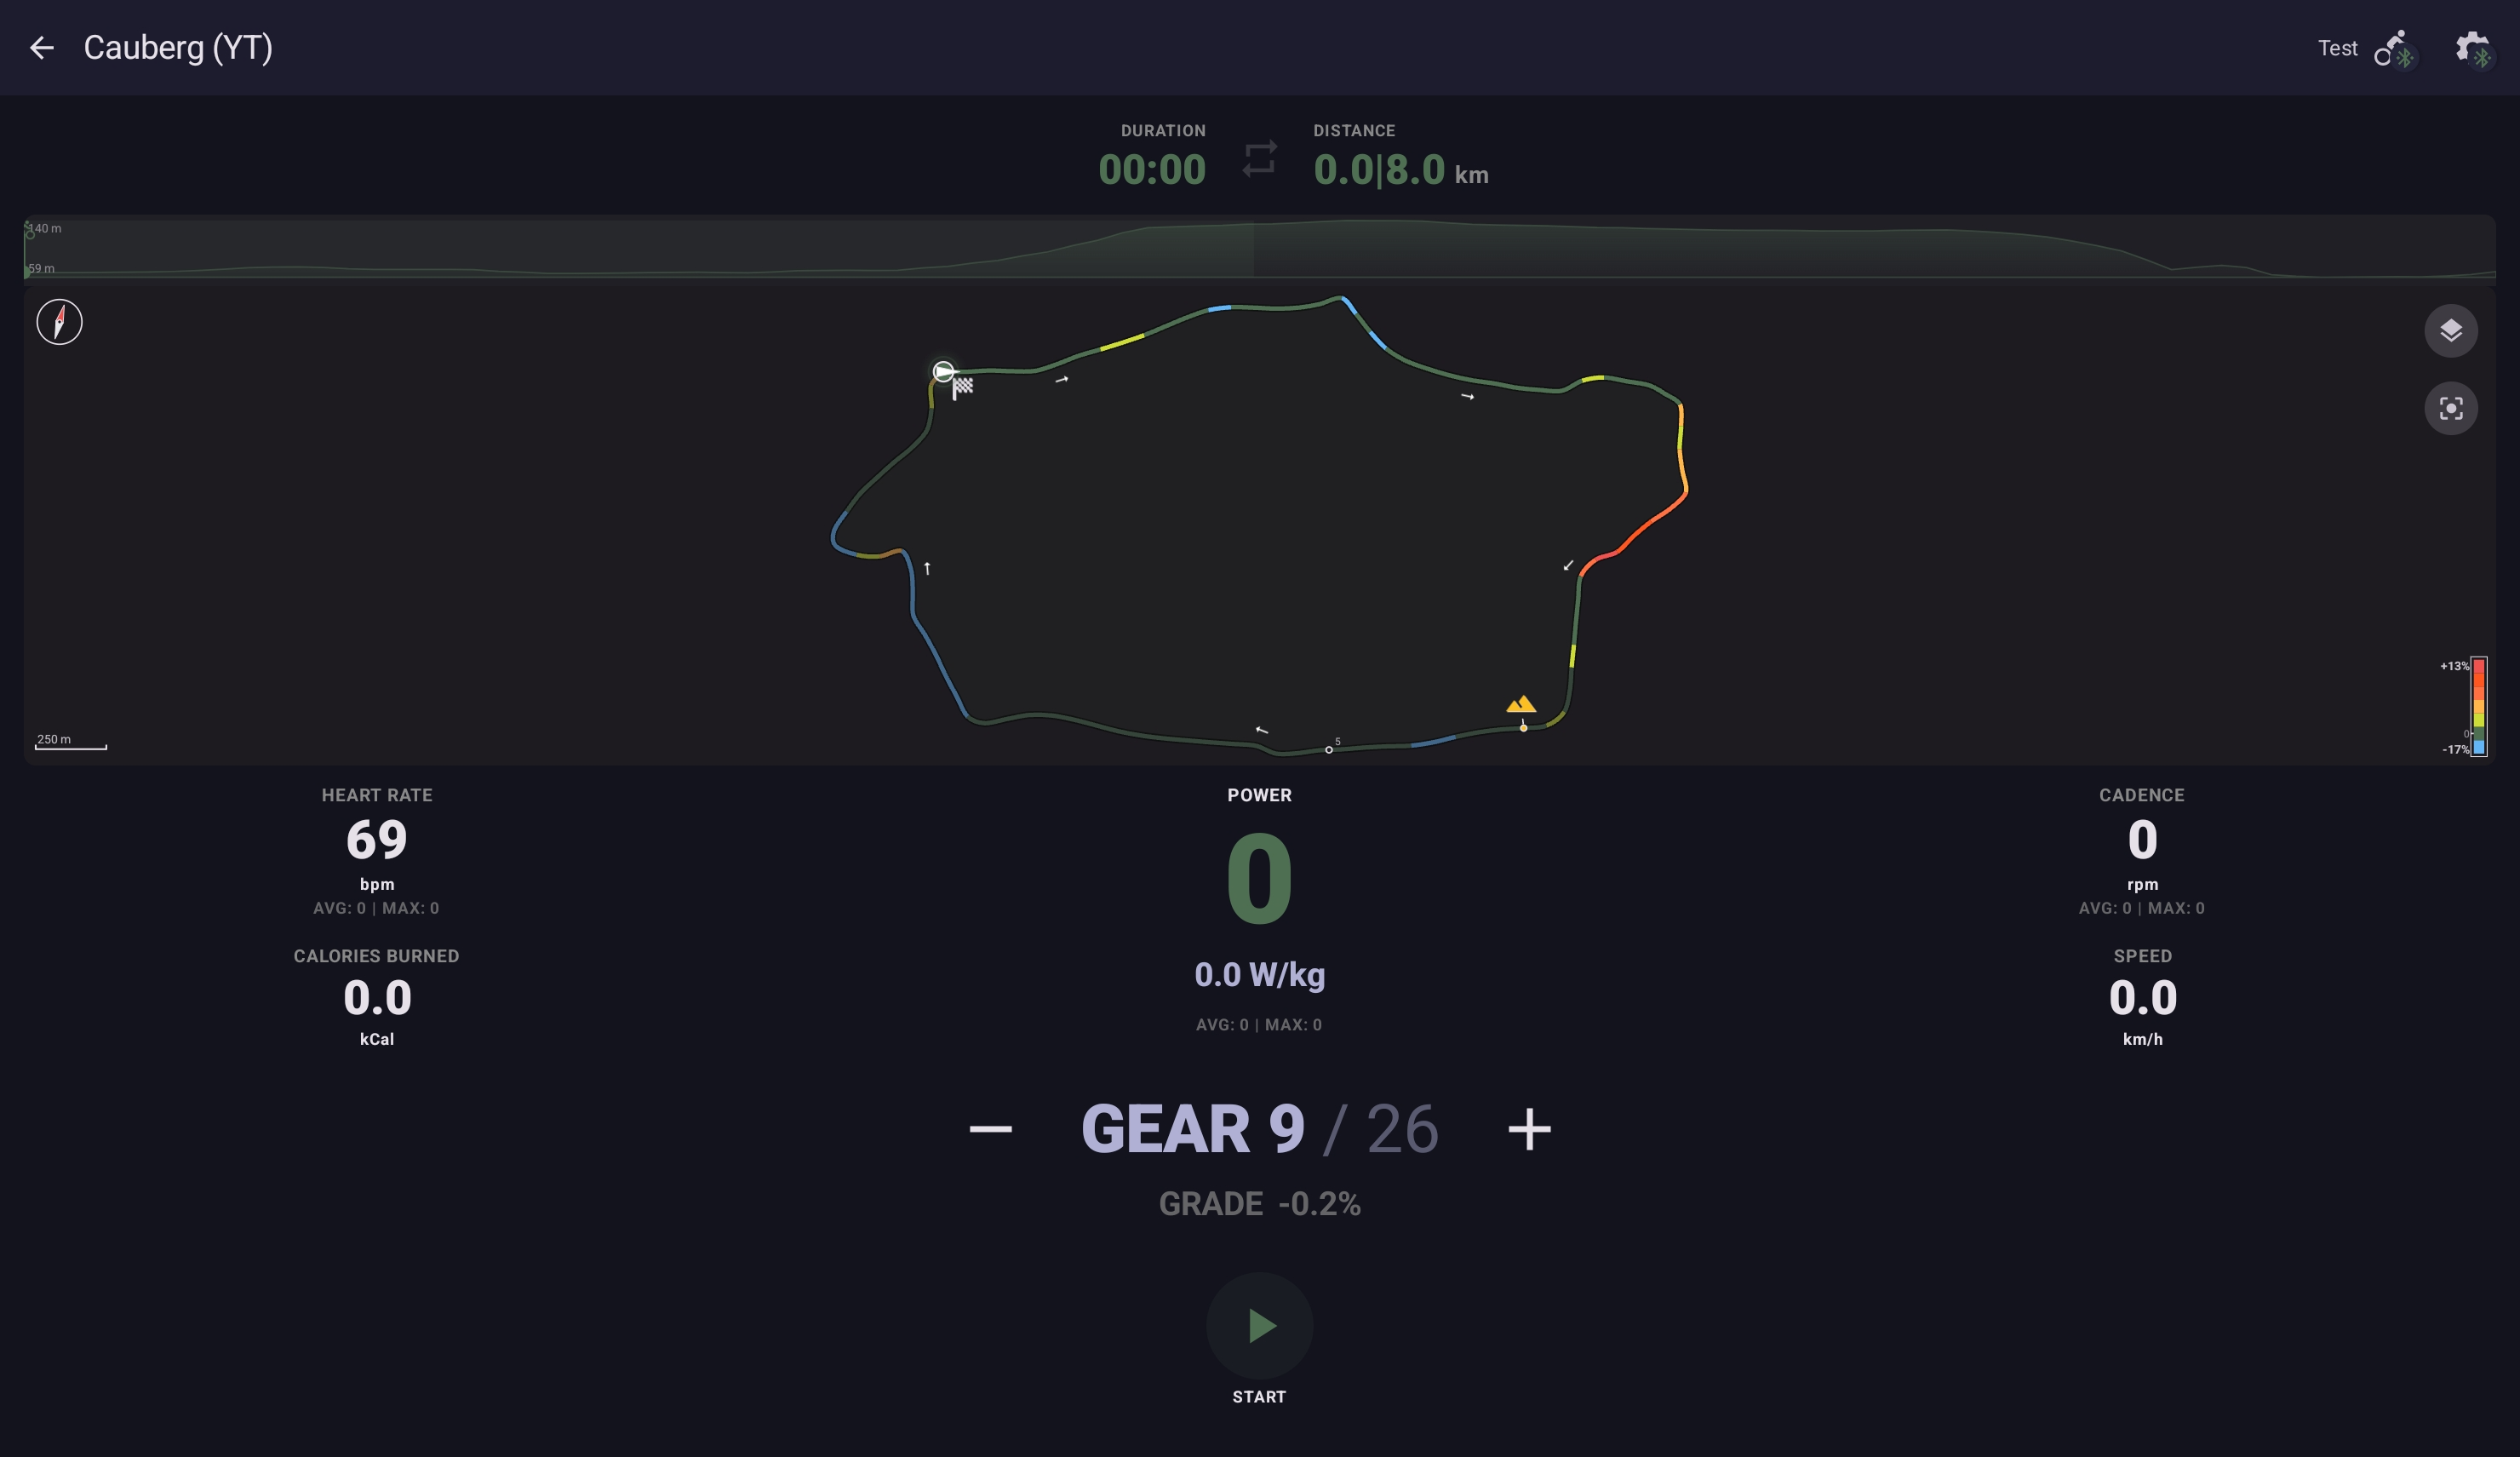
The no-basemap choice is deliberate. Smart-trainer rides happen indoors; the rider doesn't need to navigate. The polyline + gradient colouring carries everything that's useful — shape of the route, where the climbs are, how steep they get — without the visual noise of a road network or satellite imagery.
The route map is available on phones as well as tablets, from v2.1.0 onwards.
Route view modes — terrain, map, follow
Route mode supports four rider-selectable layouts of the terrain graph + the route map. Pick whichever reads best for you on the rig you're using; switch at any point during a ride.
- Terrain with map inset — the elevation-profile terrain takes the main view; the map is a small inset in one corner.
- Map with terrain inset — the route map takes the main view; the terrain profile is the inset.
- Terrain only — no map. Same as the pre-v2.1.0 default.
- Map only — no terrain.
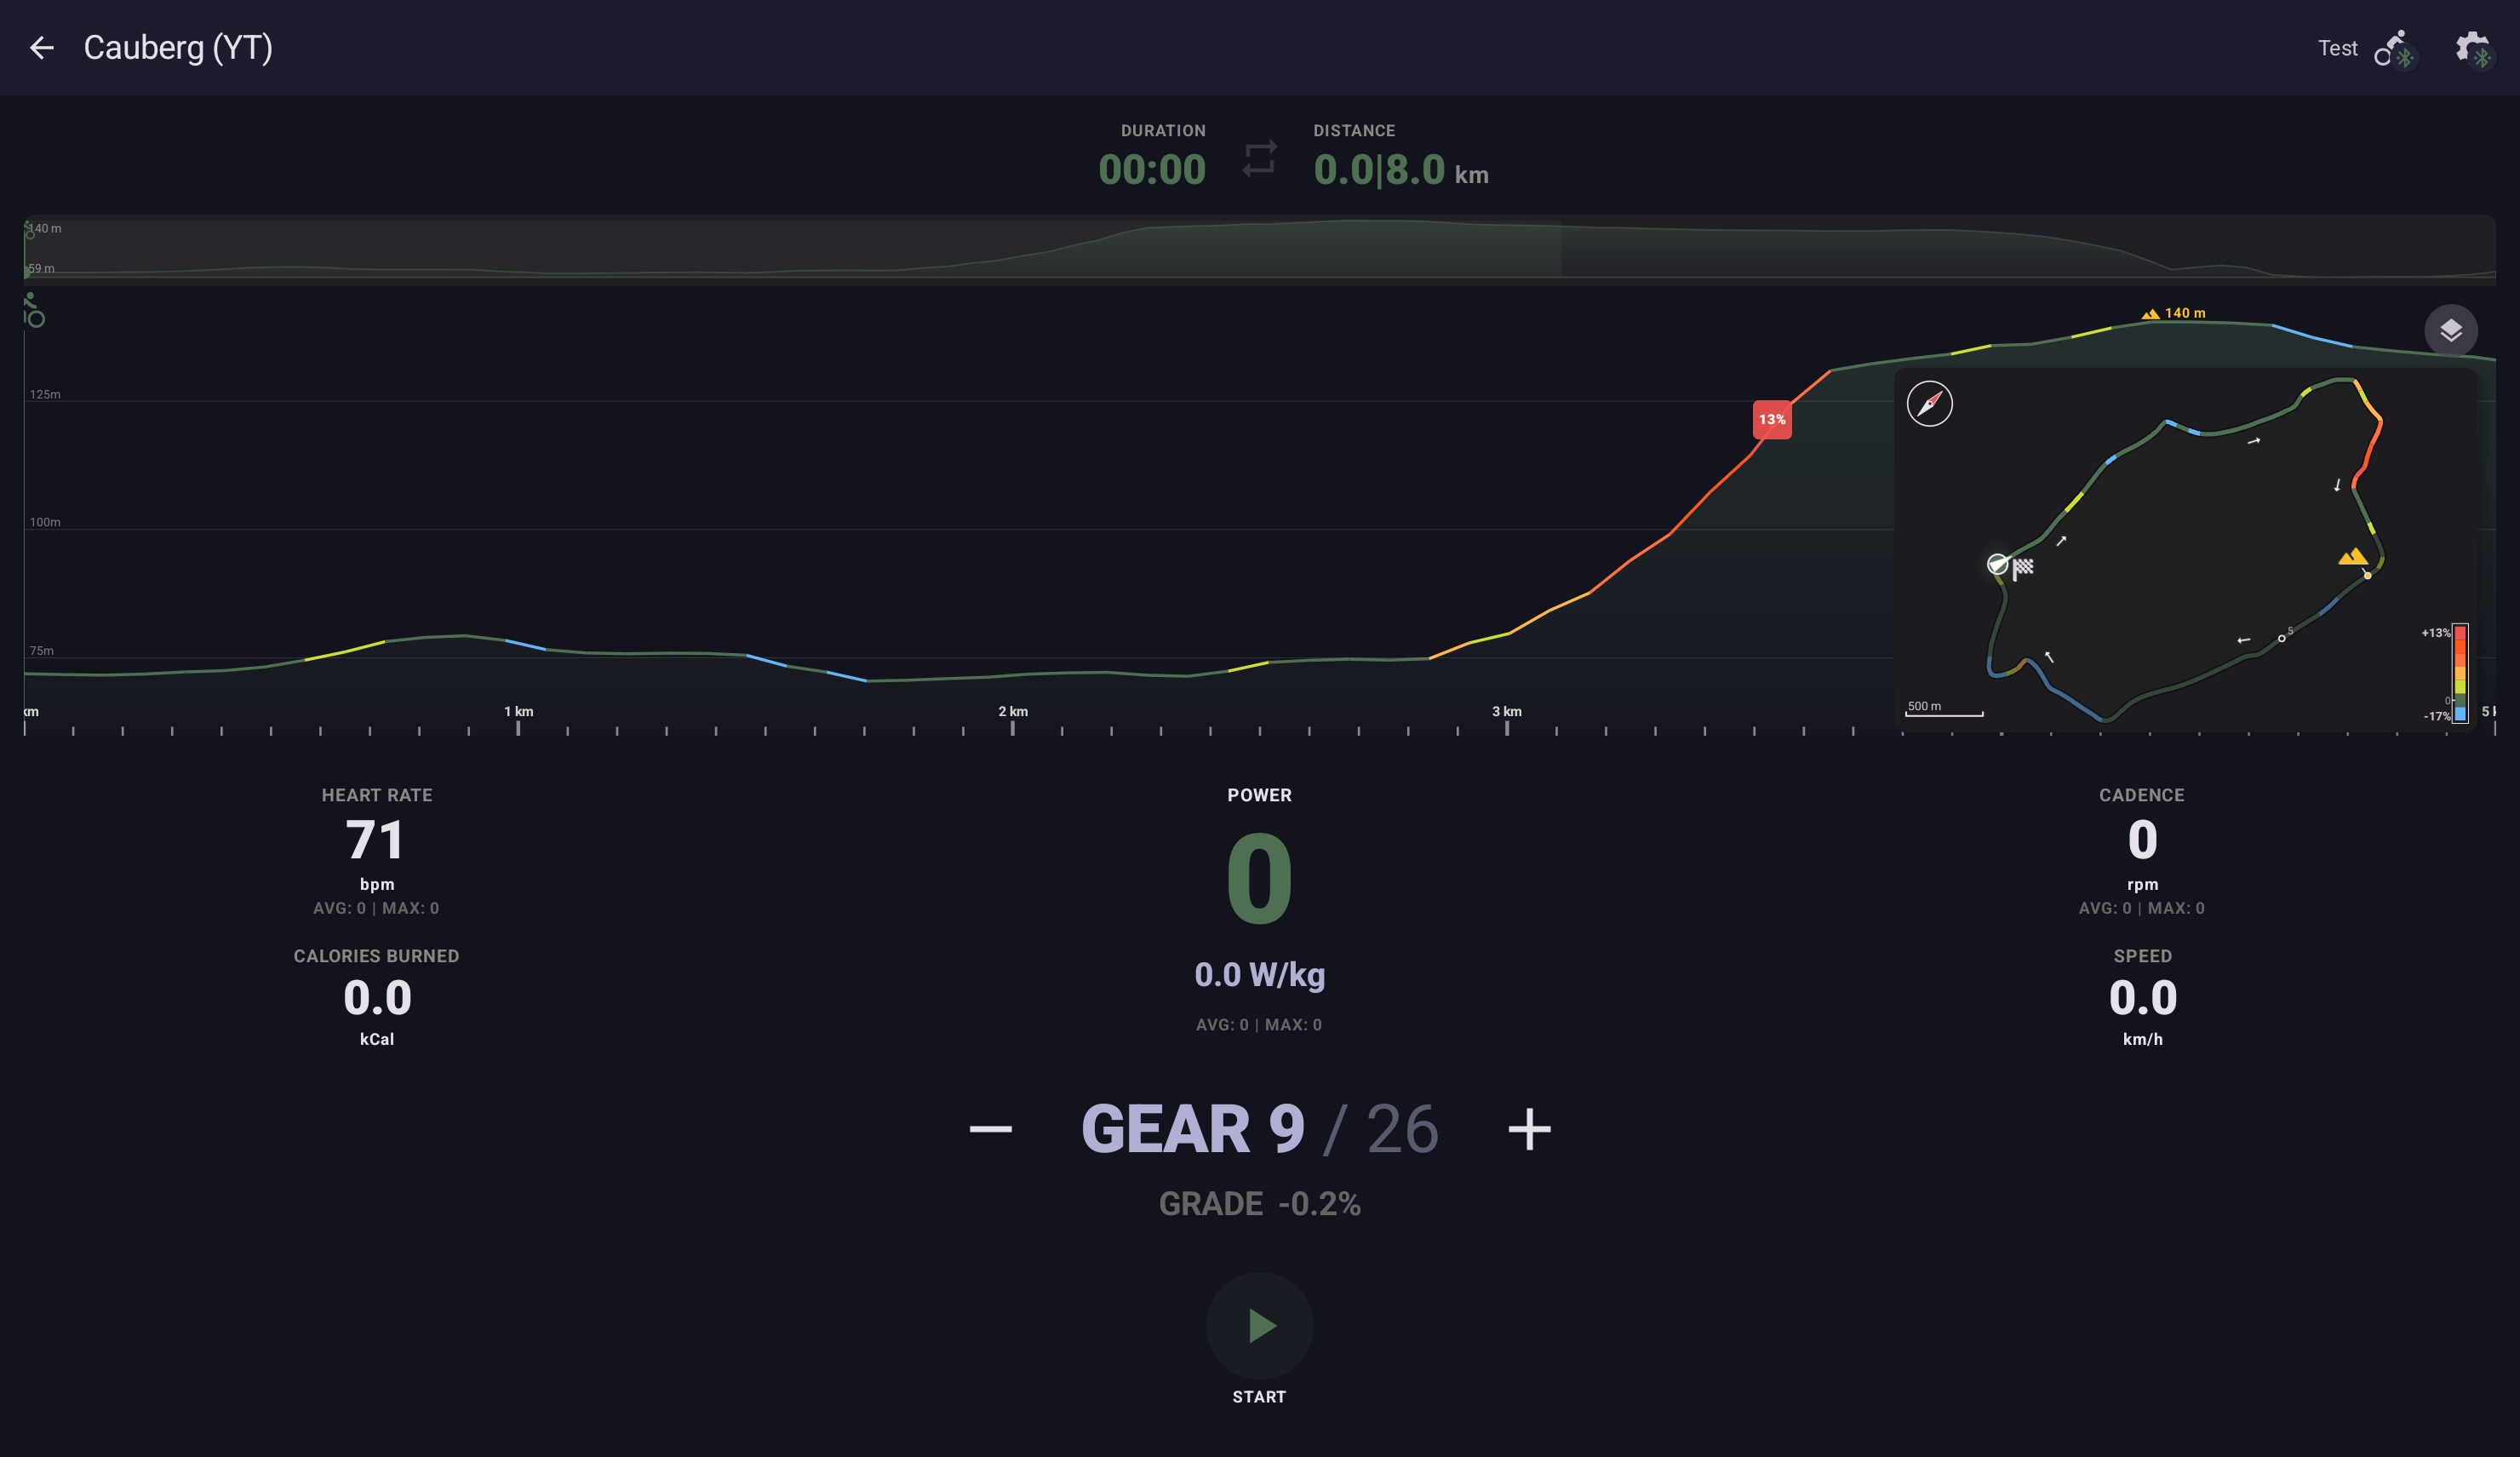
The inset is movable and resizable — drag it to a different corner, pinch to grow or shrink it. Tap the inset to swap the main and inset views; tap again to swap back.
Follow view
The map view can switch into a follow view that tracks the rider position like a sat-nav. The map rotates to keep your heading pointing up, and the zoom level paces with your speed — closer in at climb speeds, wider out as you accelerate. Roads render with a road-model finish that gives a sense of depth; the rider marker stays centred in the view.
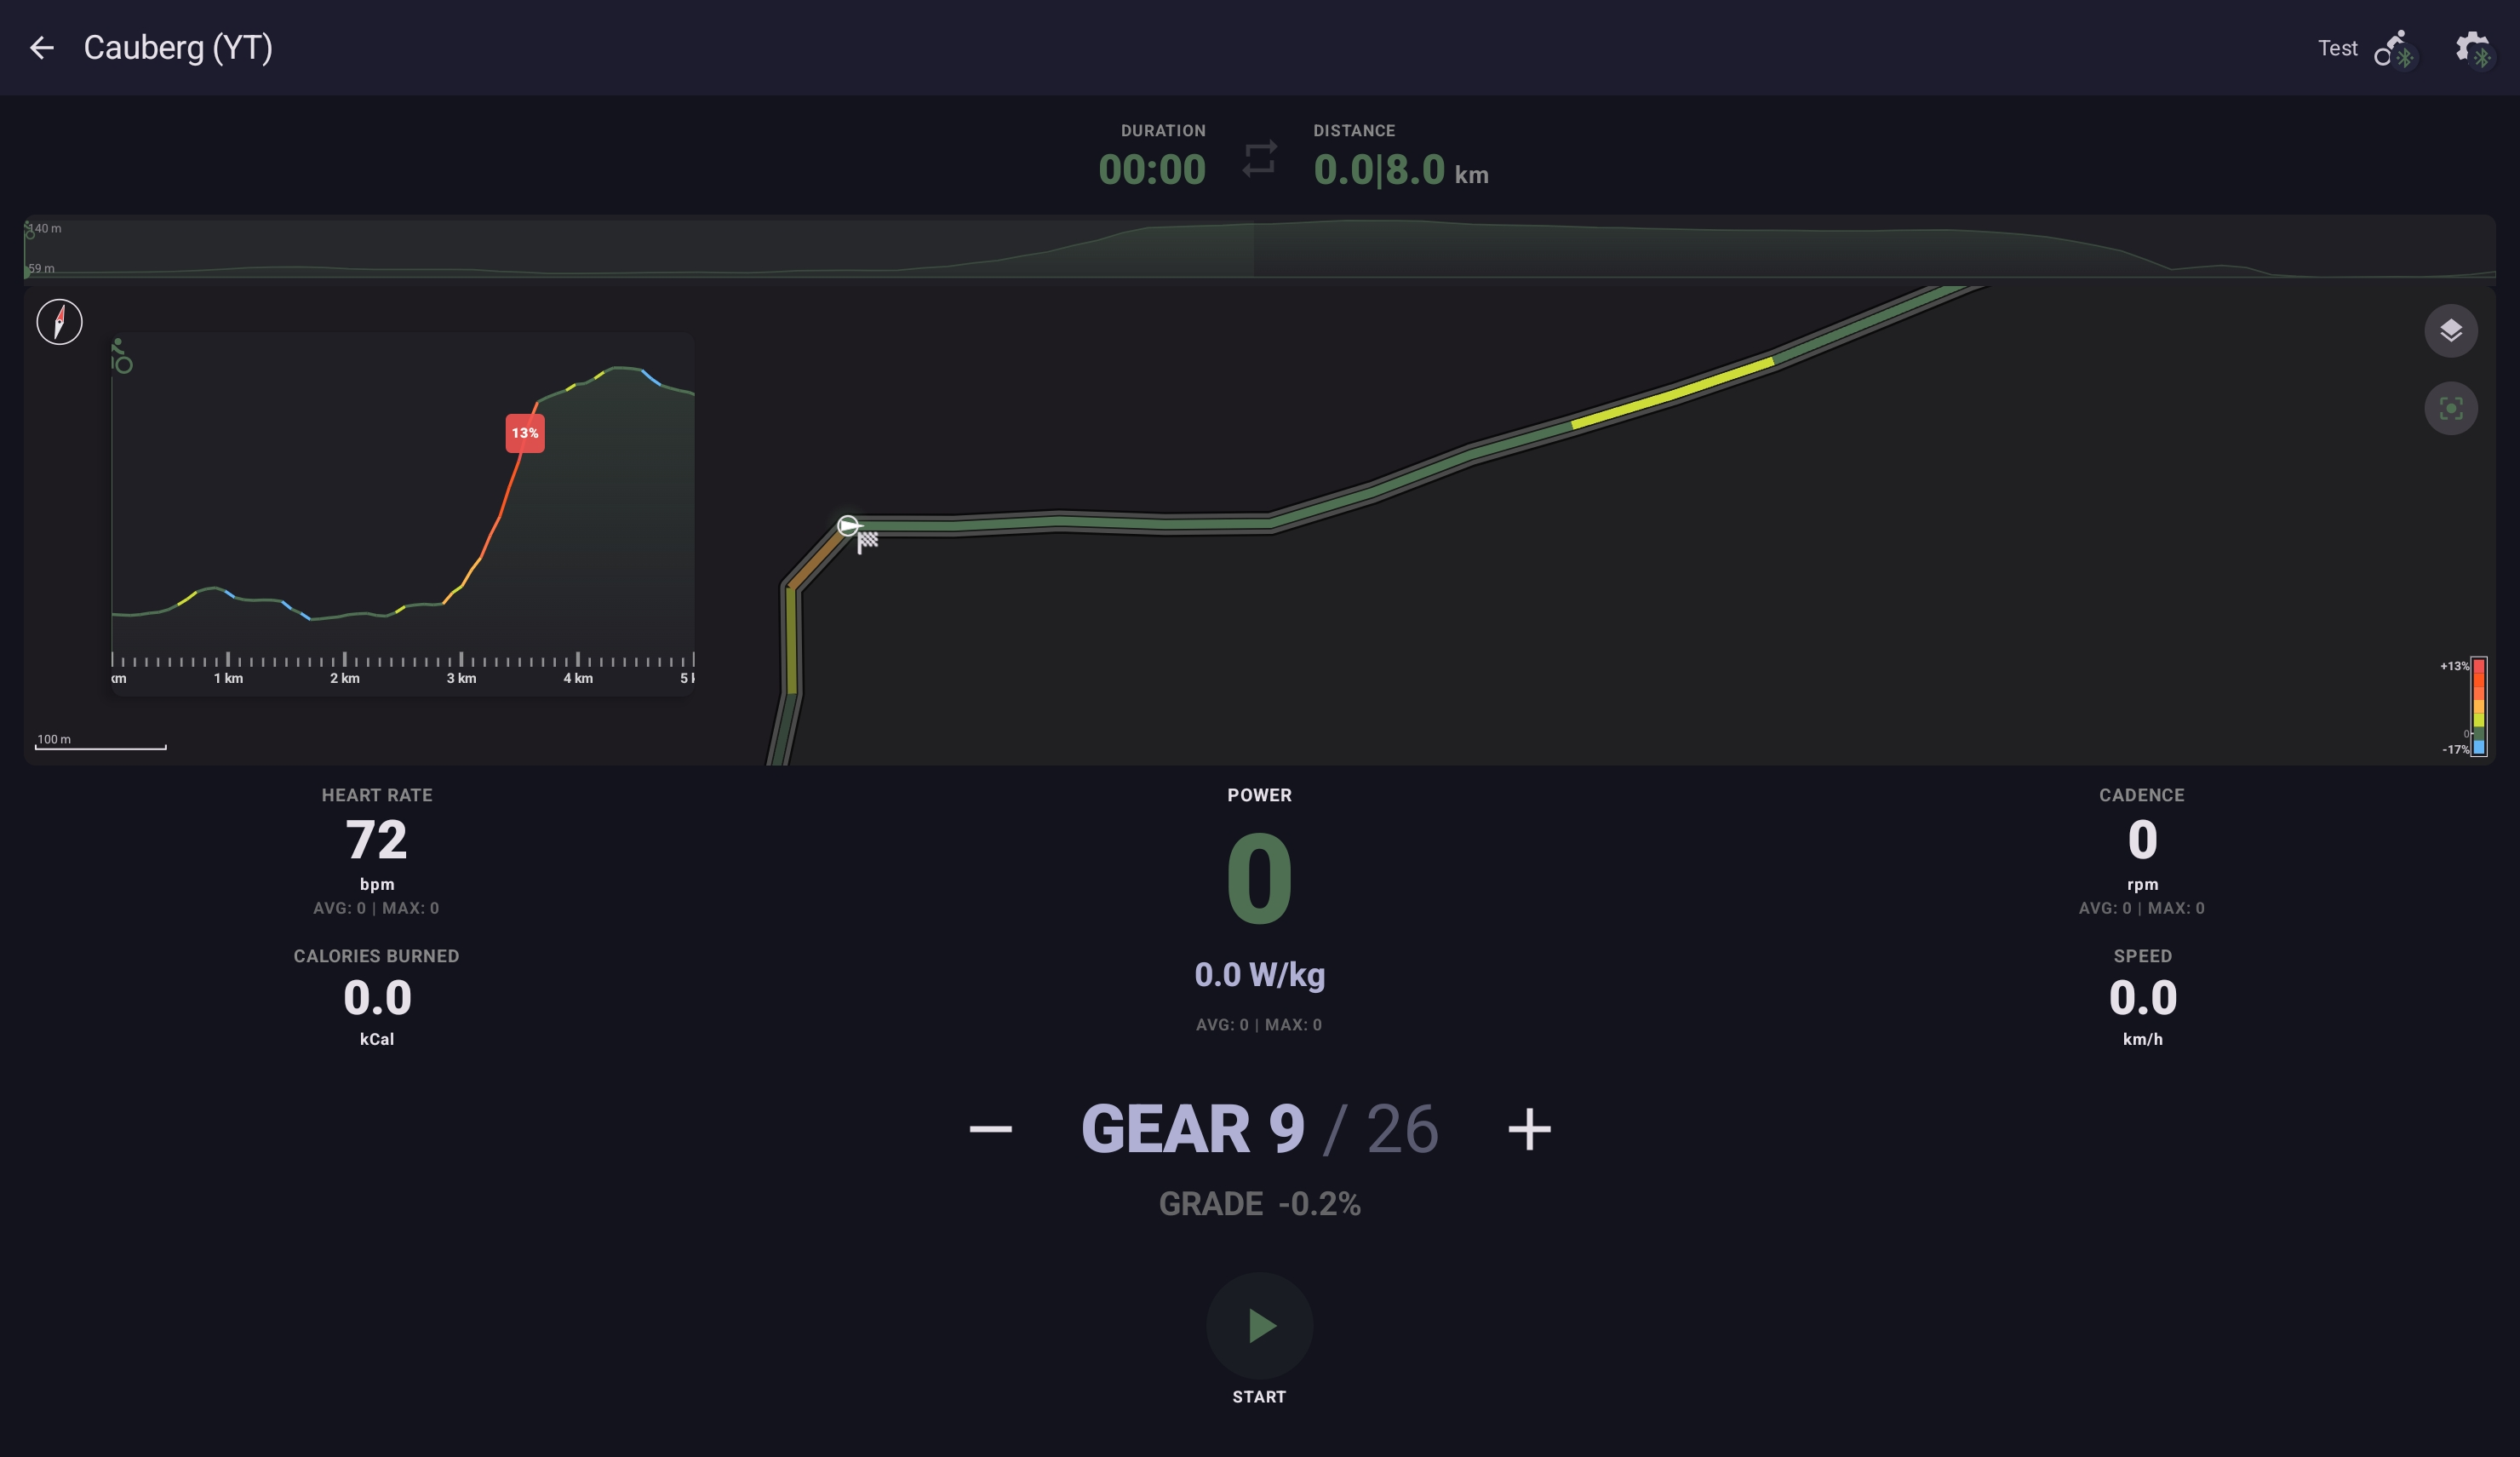
Follow view is most useful in map only or map with terrain inset layouts; in those it gives the closest indoor analogue to the outdoor riding experience. Toggle follow on or off from the layer-control button at the top right of the map view.
Supported file formats
| Format | Source | Notes |
|---|---|---|
.gpx | RideWithGPS, Komoot, Strava, Garmin Connect, OpenStreetMap-based tools | The most common format; widely supported by route-planning tools. |
.fit | Garmin Connect, Wahoo | Compact; carries elevation cleanly. |
.tcx | Garmin Training Center (legacy), various exporters | Less common than GPX but well-supported. |
All three formats carry the same core data: a sequence of track points with latitude, longitude, and (ideally) elevation.
The elevation requirement
Route rides are slope-driven, so the file needs an elevation value on every track point. A file with lat/lon only — no elevation, or elevation only on some points — produces the error "Track points have no elevation data — route needs elevation to ride."
Most files from outdoor recordings or established route-planning tools include elevation by default. Elevation is missing most often when:
- The route was drawn on a 2D map and never enriched.
- The file came from a smartphone GPS export with elevation logging disabled.
- The exporter strips elevation to reduce file size.
The next section covers adding elevation back.
Where to find good route files
- RideWithGPS — large library of user-shared routes, plus a powerful planner. Free tier exports GPX directly.
- Komoot — strong on European cycling routes. Exports GPX with elevation.
- Strava routes — export GPX/TCX from any saved or planned route.
- Garmin Connect — exports FIT or GPX from your saved courses.
- OpenStreetMap-based planners (BRouter, Bikemap, etc.) — community-driven, often free.
- Your own outdoor rides — any FIT/GPX recording from a head unit can be re-ridden as a route.
Strava routes and starred segments
Connecting a Strava account (Profile → Connected → Strava) gives Your Trainer read access to your Strava routes and your starred segments — both download and ride directly, no manual GPX export needed. This sits alongside the existing Strava ride upload that's been there since v2.0.
My Strava routes
The Route tab on the workout-selection screen gains a My Strava routes section. Each row shows the route name, distance, elevation gain, and a Strava-orange tint on the source icon so they stand apart from local routes. Tap a row to download and import the route; once installed it works the same as any other route file.
Starred segments
Starred segments — segments you've starred on Strava because you want to come back to them — appear below the routes section. Your Trainer synthesises a rideable course from the segment's elevation stream (the same data Strava's segment-effort chart draws from), so you can train against the climb at home. The course follows the segment's geometry and elevation faithfully; it doesn't add lead-in or run-out.
Both Strava routes and starred segments require Pro / Family. The OAuth scope is read-only; Your Trainer never modifies your Strava data. Disconnecting from Profile → Connected revokes access immediately.
Adding elevation to a flat file
If a file lacks elevation, run it through GPS Visualizer's elevation tool. The workflow:
- Open
gpsvisualizer.com/elevation. - Upload the GPX/FIT/TCX file.
- Pick "GPX" as the output format.
- Click "Add DEM elevation data". Pick a DEM source (NASA SRTM is a sensible default for most of the world; other sources give better detail in specific regions).
- Download the enriched file.
- Import the new file into Your Trainer.
The output is the same route with elevation values added at every track point from a digital elevation model. Resolution is typically 30 m horizontal grid — fine for indoor riding.
Importing a route
Two paths:
Share-sheet import (recommended)
- Save the route file to your tablet (download in browser, save from email, etc.).
- Open the file in your file manager (or Drive, or Gmail).
- Tap Share → Your Trainer.
- The app detects the file type, drops it into the Route tab, and you're ready to ride.
Direct import
- Open Your Trainer → workout-selection → Route tab.
- Tap the import button (top-right).
- Pick the file from local storage.
Riding a route well
- Pick the virtual-gear preset that suits you. Three sit on Profile → Virtual Gears: Road (22) models a real road cassette (50/34 × 11–30) with closer ratios in the middle where road riders spend most of their time; MTB (12) models a real 1×12 MTB cassette (32T × 10–50) with twelve gears and bigger jumps, built for climbing; Linear (26) is a synthetic preset with the broadest resistance range and evenly-spaced steps — no real-bike analogue, just the smoothest steps and most flexibility. Pick a cassette preset if you want the feel of your outdoor bike; pick Linear if you don't.
- Watch your cadence on climbs. The trainer applies real slope-resistance, so a steep climb at the wrong gear will grind you to 50 RPM in seconds. Shift early.
- Pace by feel, not by speed. Speed during a route ride is a derived metric — your effort and gearing produce it. Going for a personal best at the cost of an unsustainable effort doesn't end well halfway up a climb.
- Long routes work in split-screen. A two-hour mountain stage benefits from a video feed alongside the dashboard. The metrics stay visible; the video keeps the boredom away.
Multi-lap routes
Some routes are meant to be ridden more than once — a favourite local climb, a short city loop, a hill-repeat segment. Set a lap count at any time, before or during the ride. Set it to 3 and the trainer simulates the route end-to-end three times before the session ends.
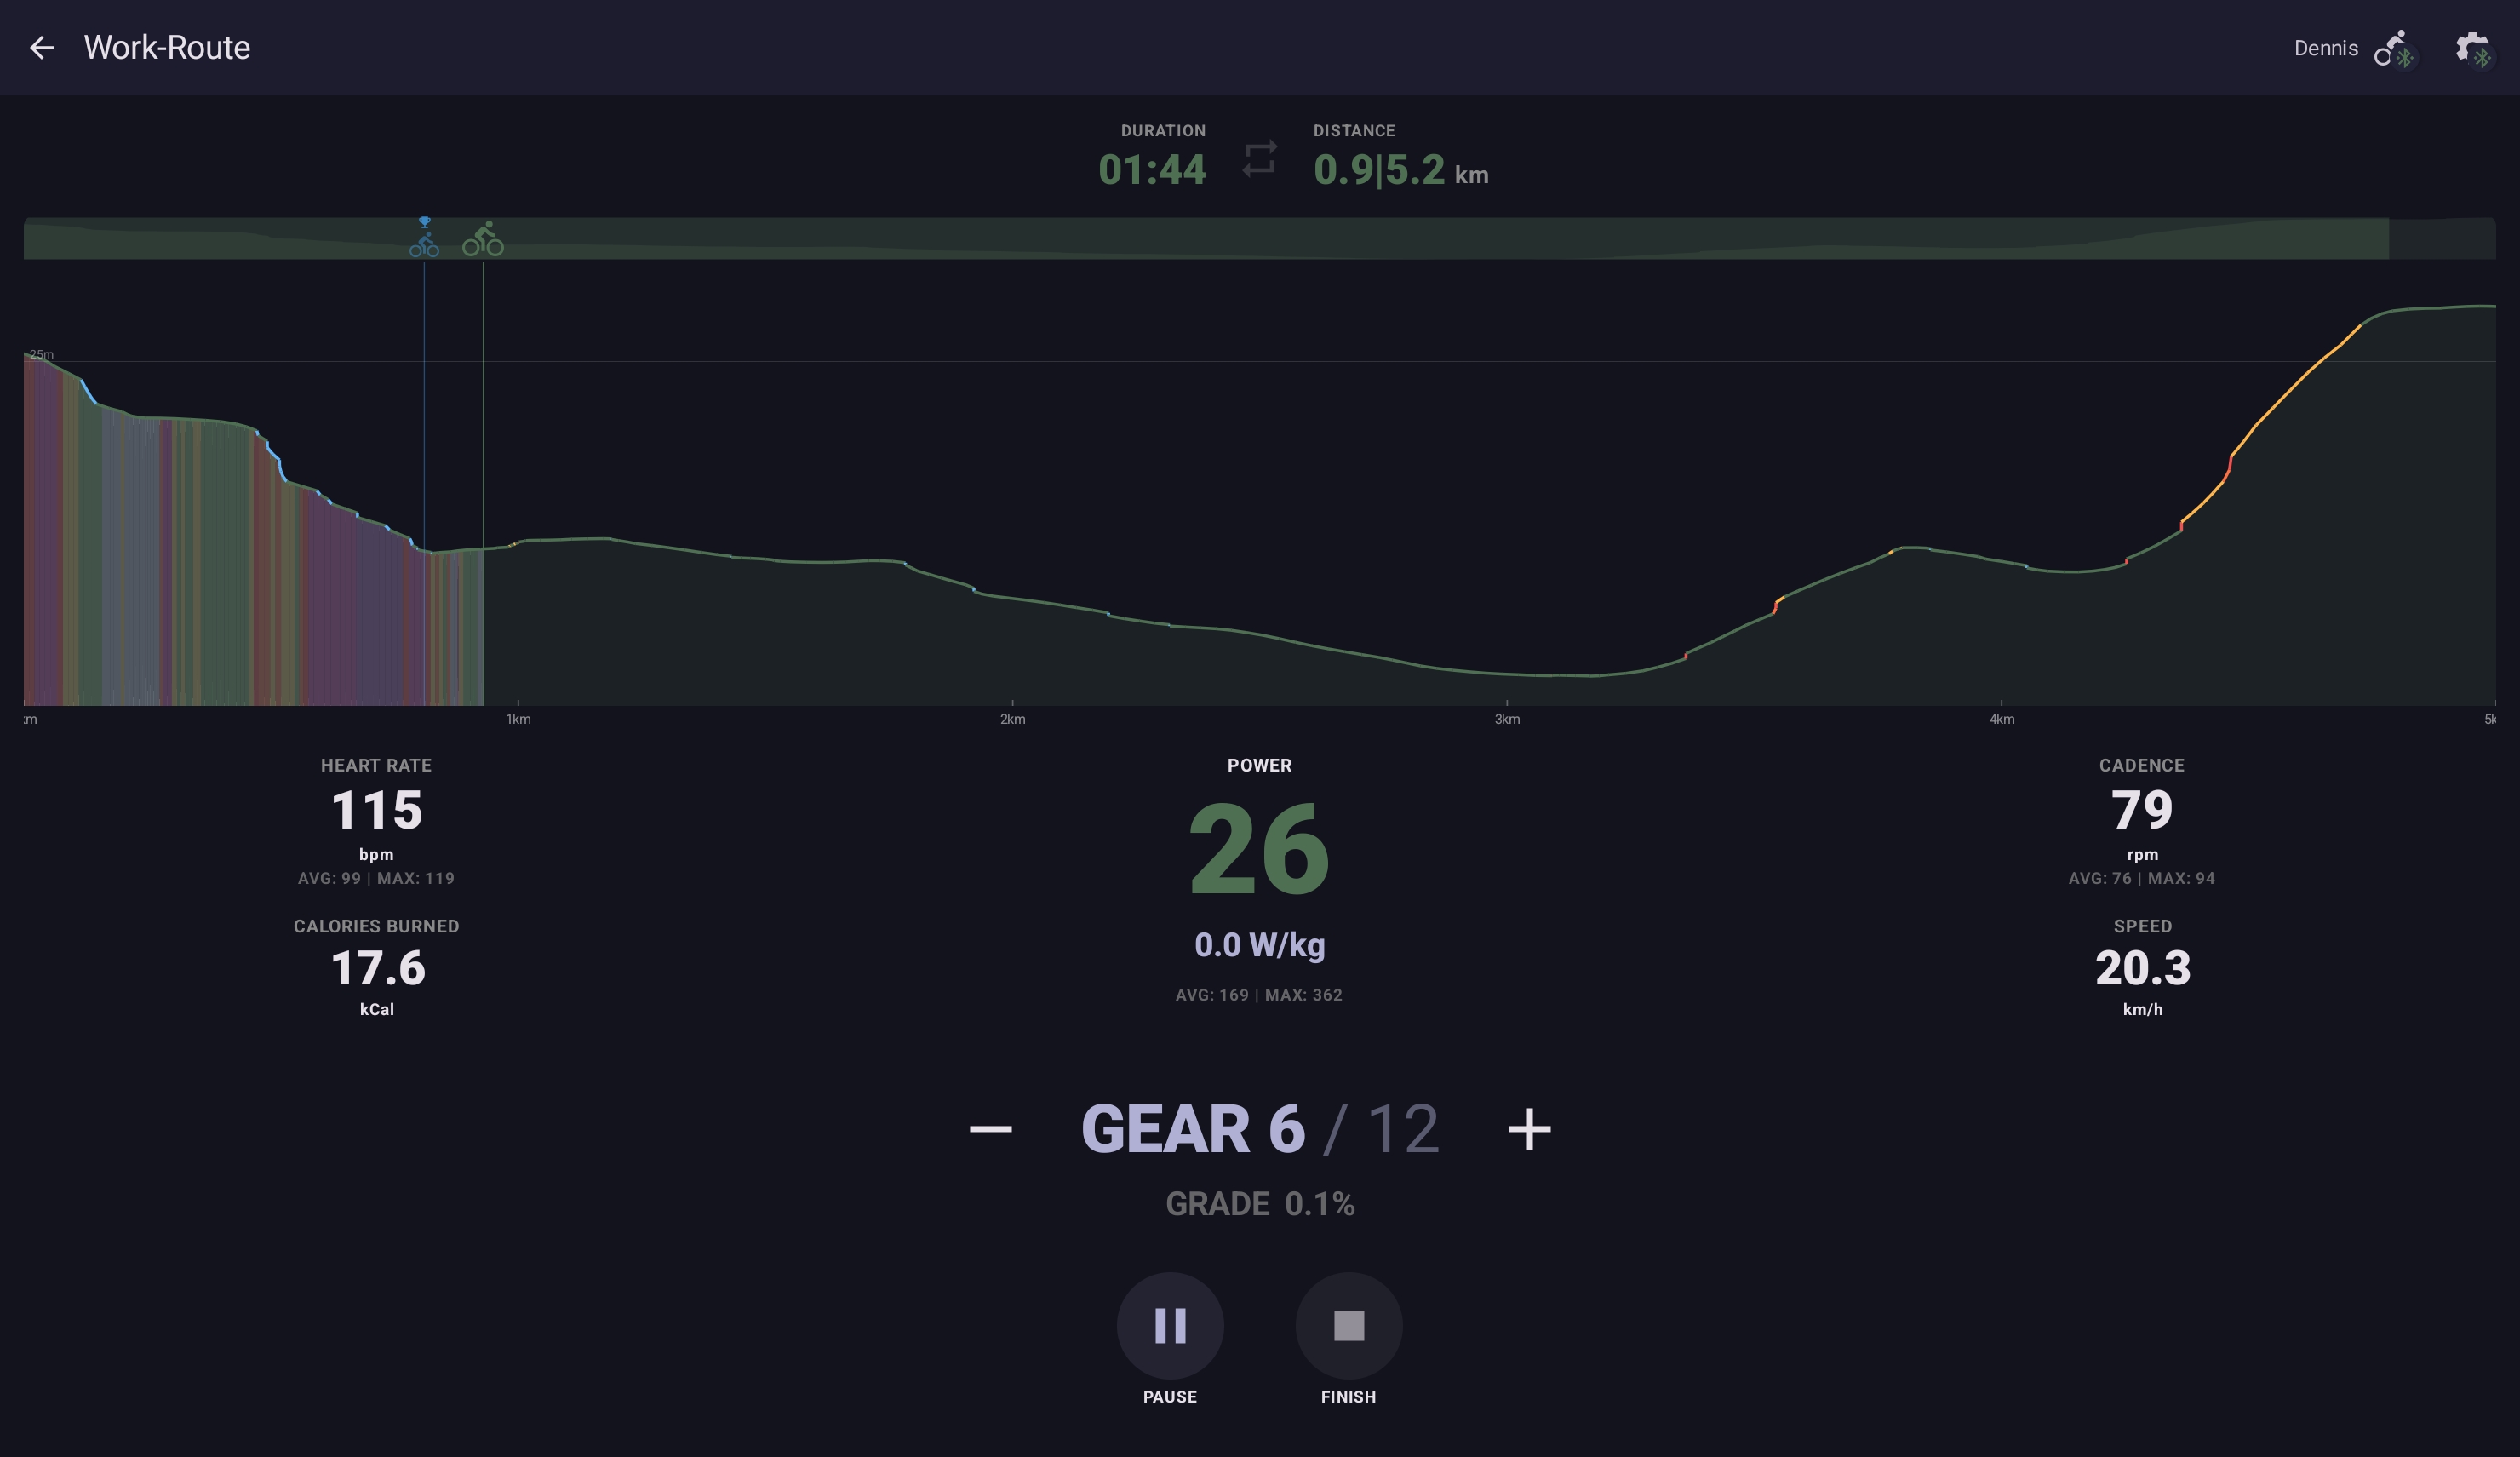
During the ride the cockpit shows the current lap and laps remaining alongside the usual metrics; the elevation profile resets at the top of each lap so the terrain reads the same way every time. Per-lap times are tracked separately, so a four-lap ride records four splits in the post-ride summary — useful for hill repeats where each climb is its own time trial.
Each lap gets its own Ghost Rider playback of your previous best on that route. Race yourself up the climb on every lap; on a four-lap session your fourth attempt can chase the fastest of the first three.
Troubleshooting
Detailed import errors live on the troubleshooting page. The common ones:
- "File is malformed or not a valid route file" — re-download from the source.
- "Track points have no elevation data" — enrich with GPS Visualizer (above).
- "No track points found" — file is structurally valid but empty; check the source export options.